What You'll Learn in This Guide
This article walks you through setting up a digital signature in both Gmail and Outlook, step by step. You'll learn what S/MIME encryption is, why it matters for everyday business email, and how to configure certificates so your recipients see that verified sender badge. Whether you're in HR sending offer letters, sales sharing proposals, or ops coordinating with vendors, this guide gives you a practical path to more secure email.
The global digital signature market was valued at USD 9.85 billion in 2025 and is projected to reach USD 154.52 billion by 2034, growing at a 35.40% CAGR. Clearly, organizations everywhere are moving toward authenticated, verifiable communications. Let's make sure you're not left behind.
What Is a Digital Signature in Email, and Why Should You Care?
Before touching any settings, it helps to understand what you're actually adding. A digital signature in email is not the same as the text block at the bottom of your messages with your name and phone number. It's a cryptographic stamp applied through a protocol called S/MIME (Secure/Multipurpose Internet Mail Extensions) that proves two things:
-
Authenticity: The email genuinely came from you, not someone spoofing your address.
-
Integrity: The content hasn't been altered after you hit send.
Think of it like a tamper-evident seal on a package. If someone opens it, you'll know.
Why This Matters for Your Team
Email spoofing and phishing remain serious threats. A survey of 700 domains across seven states found that 43% of organizations had not implemented DMARC email authentication, a basic sender verification standard. Even among the 100 largest Massachusetts corporations and agencies, only 42% had fully enforced DMARC.
Digital signatures work alongside DMARC as an additional layer. Where DMARC protects your domain reputation at the server level, S/MIME protects individual messages at the user level. For departments handling contracts, onboarding documents, or financial approvals, both layers matter.
(This distinction is part of a larger topic in technology - what’s the difference between electronic and digital signatures? If you want a quick primer on where digital signatures fit, that article lays it out.)
Now that you know the "why," let's cover the "how," starting with what you'll need before configuring anything.
Step 1: Get an S/MIME Certificate
You can't digitally sign an email without a valid S/MIME certificate. This is a small file issued by a trusted Certificate Authority (CA) that ties your identity to your email address.
Here's how to get one:
-
Choose a Certificate Authority: Popular options include Sectigo (formerly Comodo), DigiCert, and GlobalSign. Some offer free personal certificates; business-grade ones typically cost $20 to $100 per year.
-
Verify your identity: The CA will confirm you own the email address. Enterprise certificates may require additional company verification.
-
Download the certificate: You'll receive a .pfx or .p12 file. Store it securely, because this file is your cryptographic identity.
Free vs. Paid Certificates
Free S/MIME certificates work fine for personal use. If your team sends externally on behalf of a company, a paid Organization Validated (OV) certificate adds your company name to the signature, which builds recipient trust.
For a deeper look at certificate choices, validation steps, and storage options (hardware token, cloud, or file-based), see Digital Signing Certificates: What They Are & How to Issue One. This guide details what you’ll need whether you’re deploying for yourself or for an entire business team.
With your certificate downloaded and saved, you're ready to install it in your email client. Let's start with Outlook, since it has built-in S/MIME support.
Step 2: Add a Digital Signature in Outlook
Outlook (both desktop and Microsoft 365) supports S/MIME natively, making setup relatively straightforward.
Install the Certificate
-
Open Outlook on your desktop and go to File > Options > Trust Center > Trust Center Settings.
-
Click Email Security in the left panel.
-
Under "Digital IDs (Certificates)," click Import/Export.
-
Browse to your .pfx file, enter the password you set during download, and click OK.
-
Back in Email Security, click Settings under "Encrypted email," select your new certificate, and click OK.
Sign Your Emails
Once installed, signing is simple:
-
For a single message: Open a new email, click Options > Sign (the ribbon icon with a certificate badge), then send.
-
For all outgoing messages: Go back to Trust Center > Email Security and check "Add digital signature to outgoing messages."
Your recipients will see a small ribbon or seal icon indicating your email is digitally signed. They can click it to view your certificate details.
Troubleshooting Common Outlook Issues
-
"Certificate not found" error: Make sure the certificate's email address matches your Outlook sending address exactly.
-
Recipient sees a warning: This usually means they don't have S/MIME support enabled. The signature data appears as a smime.p7s attachment, which is normal.
-
Certificate expired: Certificates typically last one to three years. Set a calendar reminder to renew before expiration.
With Outlook configured, let's move to Gmail, which handles things a bit differently.
Step 3: Add a Digital Signature in Gmail
Gmail supports S/MIME, but only for Google Workspace accounts (the paid business tier). Personal @gmail.com accounts don't have this feature. If your company uses Workspace, here's the process.
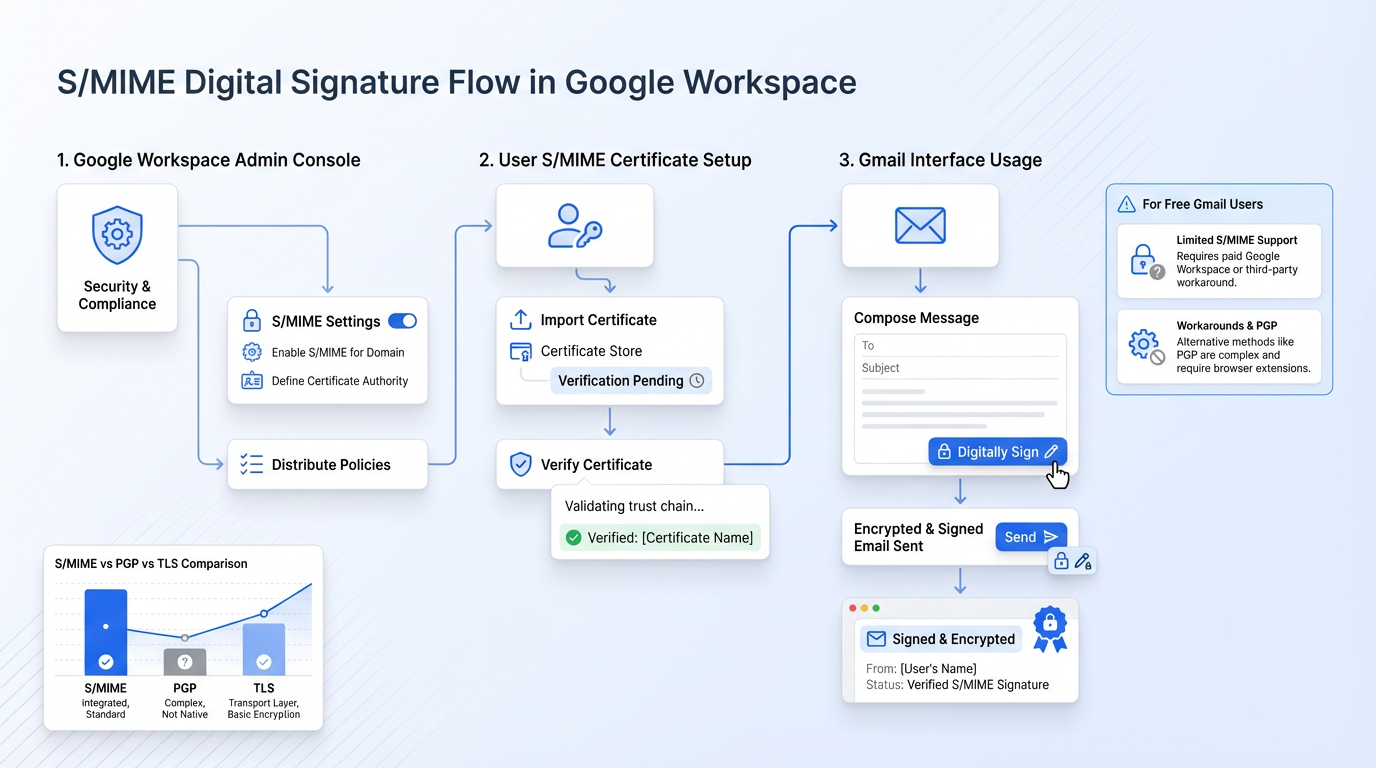
Admin Setup (Google Workspace)
Your Google Workspace admin needs to enable S/MIME first:
-
Sign in to the Google Admin console (admin.google.com).
-
Go to Apps > Google Workspace > Gmail > User settings.
-
Scroll to the S/MIME section and check "Enable S/MIME encryption for sending and receiving emails."
-
Optionally, upload root certificates if your organization uses a specific CA.
-
Click Save. Changes can take up to 24 hours to propagate.
User Setup
Once the admin enables S/MIME:
-
Open Gmail in your browser and go to Settings > See all settings > Accounts.
-
Find your email address and click Edit info.
-
Upload your S/MIME certificate (.pfx file) and enter the password.
-
Gmail will now show a lock icon on outgoing emails. A green lock means S/MIME encrypted; a gray lock means standard TLS.
What If You're on a Free Gmail Account?
Free Gmail users can't use native S/MIME. Workarounds include browser extensions like Mailvelope (PGP-based, not S/MIME) or using a desktop client like Thunderbird with your Gmail account via IMAP. Neither is as seamless as Workspace S/MIME, but they provide a path forward.
To see the technology differences and security impacts between S/MIME and other standards (like PGP), you can check out the quick comparison in What’s the difference between electronic and digital signatures?. It explains when each standard makes sense for your needs.
Understanding how Gmail and Outlook handle digital signatures differently helps you pick the right approach for your organization. Next, let's look at what's happening once that signed email reaches someone's inbox.
Step 4: Verify and Manage Your Signed Emails
Signing emails isn't a "set and forget" task. Here's what ongoing management looks like.
-
Check recipient compatibility: Not all email clients display S/MIME signatures the same way. Test by sending signed emails to colleagues using different platforms.
-
Monitor certificate expiration: Keep a spreadsheet or calendar entry for renewal dates, especially if multiple team members have certificates.
-
Educate your team: If you're rolling this out across a department, a quick 10-minute walkthrough saves hours of support tickets later.
For more on how to verify digital signatures, see How to Verify If a Digital Signature Is Authentic. This resource walks you through the process - and the telltale signs of an authentic, unaltered message - step by step.
Digital Signatures Beyond Email
While S/MIME secures your email messages, many teams also need to digitally sign documents like contracts, NDAs, and approval forms. This is where platforms like Agrello come in, offering legally binding digital signatures for documents without the complexity of certificate management. If your goal is to verify both the sender and the documents they're sending, combining S/MIME email signatures with a dedicated document signing tool covers both bases.
If you’re considering these broader options and want to see how cloud-based solutions streamline signature workflows, consult How to Add a Digital Signature to a PDF Automatically. It covers practical automation for teams that need both security and convenience.
On the broader scale, even government agencies are accelerating adoption: the global government digital signature market was USD 992.6 million in 2024 and is projected to reach USD 7,494.3 million by 2030, reflecting a 41.3% CAGR. When governments move this fast, the private sector rarely stays behind for long.
Quick-Reference: Digital Signature Setup Checklist
Here's a snapshot you can bookmark or share with your team:
-
Obtain an S/MIME certificate from a trusted CA.
-
Install the certificate in Outlook (Trust Center) or Gmail (Workspace admin + user settings).
-
Enable signing for individual messages or all outgoing mail.
-
Test with recipients on different email platforms.
-
Set reminders for certificate renewal.
-
Train team members on what the signature icons mean.
A digital signature in email is a cryptographic proof applied via S/MIME that verifies the sender's identity and confirms the message hasn't been altered in transit. It requires an S/MIME certificate installed in your email client and is supported natively in Outlook and Google Workspace Gmail.
Conclusion
Adding a digital signature in email is one of those tasks that feels technical at first but becomes second nature after a single setup. Get your S/MIME certificate, install it in Outlook or Gmail Workspace, enable signing, and your recipients will know your messages are genuine.
With only 14.9% of email domains worldwide having implemented any DMARC policy as of December 2025, the bar for email security across most organizations is still remarkably low. By adding S/MIME digital signatures, you're already ahead of the curve. Your clients, partners, and colleagues will notice the difference, even if they can't articulate exactly why your emails feel more trustworthy.
Start with one team member, test it for a week, and roll it out from there. The setup takes 15 minutes. The credibility lasts much longer.