What This Guide Covers
Converting a handwritten signature into a reusable digital format is simpler than most people think. In this guide, you'll walk through every step: capturing your signature on paper, scanning or photographing it, cleaning up the image, saving it in the right file format, and inserting it into documents you use every day. We'll also cover the legal basics so you can use your digitized signature with confidence.
Whether you're an HR specialist preparing offer letters, a sales coordinator sending proposals, or an operations lead managing vendor agreements, this process will save you real time and money. Consider that each paper-based signature costs roughly $6.50 in printing, copying, scanning, and storage, and it's easy to see why businesses are moving toward digital workflows.
Write Your Signature on Clean White Paper
Before you can scan to e-signature format, you need a high-quality source image. A rushed scribble on a sticky note won't cut it.
Grab a blank sheet of white printer paper and a pen with dark ink. Black works best, though dark blue is fine too. Sign your name in the center of the page, leaving plenty of white space around it.
Here are a few tips:
-
Use a felt-tip or gel pen for consistent, bold lines
-
Sign at a natural size, roughly the same way you'd sign a contract
-
Write your signature two or three times so you can pick the best one later
-
Avoid lined or colored paper, as it complicates the background removal process
If you tend to sign quickly and your handwriting gets shaky, take a breath first. A clean, confident stroke translates much better once it's digitized.
Getting this first step right makes everything that follows faster. A crisp signature on white paper means less editing and a more professional result.
Scan or Photograph Your Signature
Now that you have a clean signature on paper, you need to get it onto your computer or phone. You have two main options.
Using a Flatbed Scanner
A flatbed scanner gives you the highest quality result. Set it to at least 300 DPI (dots per inch) and scan in color or grayscale. Save the file as a PNG or TIFF for the sharpest detail.
-
Place the paper flat against the glass, avoiding wrinkles or shadows
-
Preview the scan before saving to make sure the signature is centered
-
Crop the image tightly around the signature
Using a Smartphone Camera
No scanner? Your phone camera works surprisingly well. Hold it directly above the paper (not at an angle) in good, even lighting. Natural daylight near a window is ideal.
-
Avoid flash, as it can create glare and wash out the ink
-
Use your phone's document scanning feature (available in most camera apps and note-taking apps) for automatic cropping and contrast adjustment
-
Take multiple shots and pick the sharpest one
Either method gets you a usable image. The key is good lighting, a straight angle, and enough resolution to preserve the detail of your pen strokes.
Clean Up and Remove the Background
A raw scan usually includes a slightly gray or off-white background, stray marks, or uneven lighting. Cleaning this up gives you a signature that looks polished on any document.
Quick Cleanup With Free Tools
You don't need professional design software. Free image editors like GIMP, Photoshop Express, or even PowerPoint can handle the basics:
-
Increase the contrast so the ink stands out sharply against the background
-
Adjust brightness to push the background closer to pure white
-
Use the eraser tool to remove any specks, smudges, or stray marks near the signature
Making the Background Transparent
For the most flexible result, remove the background entirely and save the file as a PNG with transparency. This lets you place the signature on any document without a visible white box around it.
-
In GIMP or Photoshop, use the "Select by Color" or "Magic Wand" tool to select the white background, then delete it
-
Online tools like remove.bg or Cleanup.pictures can automate this in seconds
-
Double-check the edges of your letters to make sure no ink was accidentally removed
A transparent PNG is the gold standard for a reusable digital signature. It layers cleanly over contracts, PDFs, and letterheads without covering other text or design elements.
Save in the Right Format

How you save your signature file determines where and how easily you can use it. Different formats serve different purposes.
-
PNG (with transparency): Best all-around choice. Works in Word, Google Docs, PDFs, and email signatures
-
JPEG: Smaller file size, but no transparency support. Fine for simple use cases
-
SVG: A vector format that scales to any size without losing quality. Ideal if your IT team or design team wants to embed the signature into templates
Store the final file somewhere accessible, like a dedicated folder on your desktop, a shared drive, or a cloud storage service. Name it clearly (e.g., "JSmith_Signature_Transparent.png") so anyone on your team can locate it.
Having your signature ready in the right format means you'll never need to repeat the scanning process. One good file serves you for years. For a deeper dive into file formats and standards in e-signing, check out What are PAdES, XAdES, and ASiC signature formats?.
Insert Your Digital Signature Into Documents
This is where the payoff happens. With your clean, transparent signature file saved, inserting it into documents takes just a few clicks.
In Microsoft Word or Google Docs
-
Place your cursor where the signature should appear
-
Use "Insert > Image" and select your PNG file
-
Resize it to look natural, roughly the same size as a handwritten signature
-
In Word, set the image wrapping to "In Front of Text" for precise positioning
For more detailed instructions on this process, see How to create a digital signature in Microsoft Word.
In PDF Files
Most PDF editors (Adobe Acrobat, Preview on Mac, or free tools like Smallpdf) let you add an image stamp. Open the document, select "Add Image" or "Stamp," and place your signature on the signature line.
For a comparison of tools and platforms for digital signing, consult How to Use a Digital Signature Generator (Free & Paid Tools).
In E-Signature Platforms
Many modern signing platforms let you upload a signature image as your default. Instead of drawing with a mouse or typing your name in a script font, you use the actual image of your handwriting. Platforms like Agrello, for example, let teams manage document signing workflows while keeping the personal feel of a real handwritten signature.
Once you've placed the signature a few times, it becomes second nature. The whole point is to remove friction from your daily document workflow.
Legal Considerations for Digitized Handwritten Signatures
Before you start applying your new digital signature to every contract that crosses your desk, it's worth understanding a few legal basics.
In most countries, including the U.S. (under the ESIGN Act) and the EU (under eIDAS), electronic signatures are legally valid for the majority of business transactions. A scanned image of your handwritten signature generally qualifies as a simple electronic signature.
However, there are limits:
-
Some documents (real estate deeds, court filings, notarized forms) may require wet-ink signatures or qualified electronic signatures
-
For higher assurance, a qualified digital signature with cryptographic verification offers stronger legal standing than a simple image
-
Always check your industry's specific compliance requirements, especially in finance, healthcare, or government
For a breakdown of key laws and how electronic signatures hold up in court, see Electronic Signature Definition: Meaning, Legality & Use Cases.
The adoption trend is clear. Europe's digital signature market was valued at $1.97 billion in 2024 and is expected to reach $26.80 billion by 2032, growing at a 38.8% CAGR. Businesses and governments are moving in this direction fast. Even in Lithuania, the share of adults using qualified electronic signatures reached 32% in 2022, up from just 6% back in 2014.
For everyday business documents like offer letters, purchase orders, and internal approvals, a digitized handwritten signature works just fine. For high-stakes contracts, consult your legal team about whether you need a higher level of authentication.
For a clear comparison of security, legal reliability, and best use cases, check out What’s the difference between electronic and digital signatures?.
How to Turn a Handwritten Signature Into a Digital One
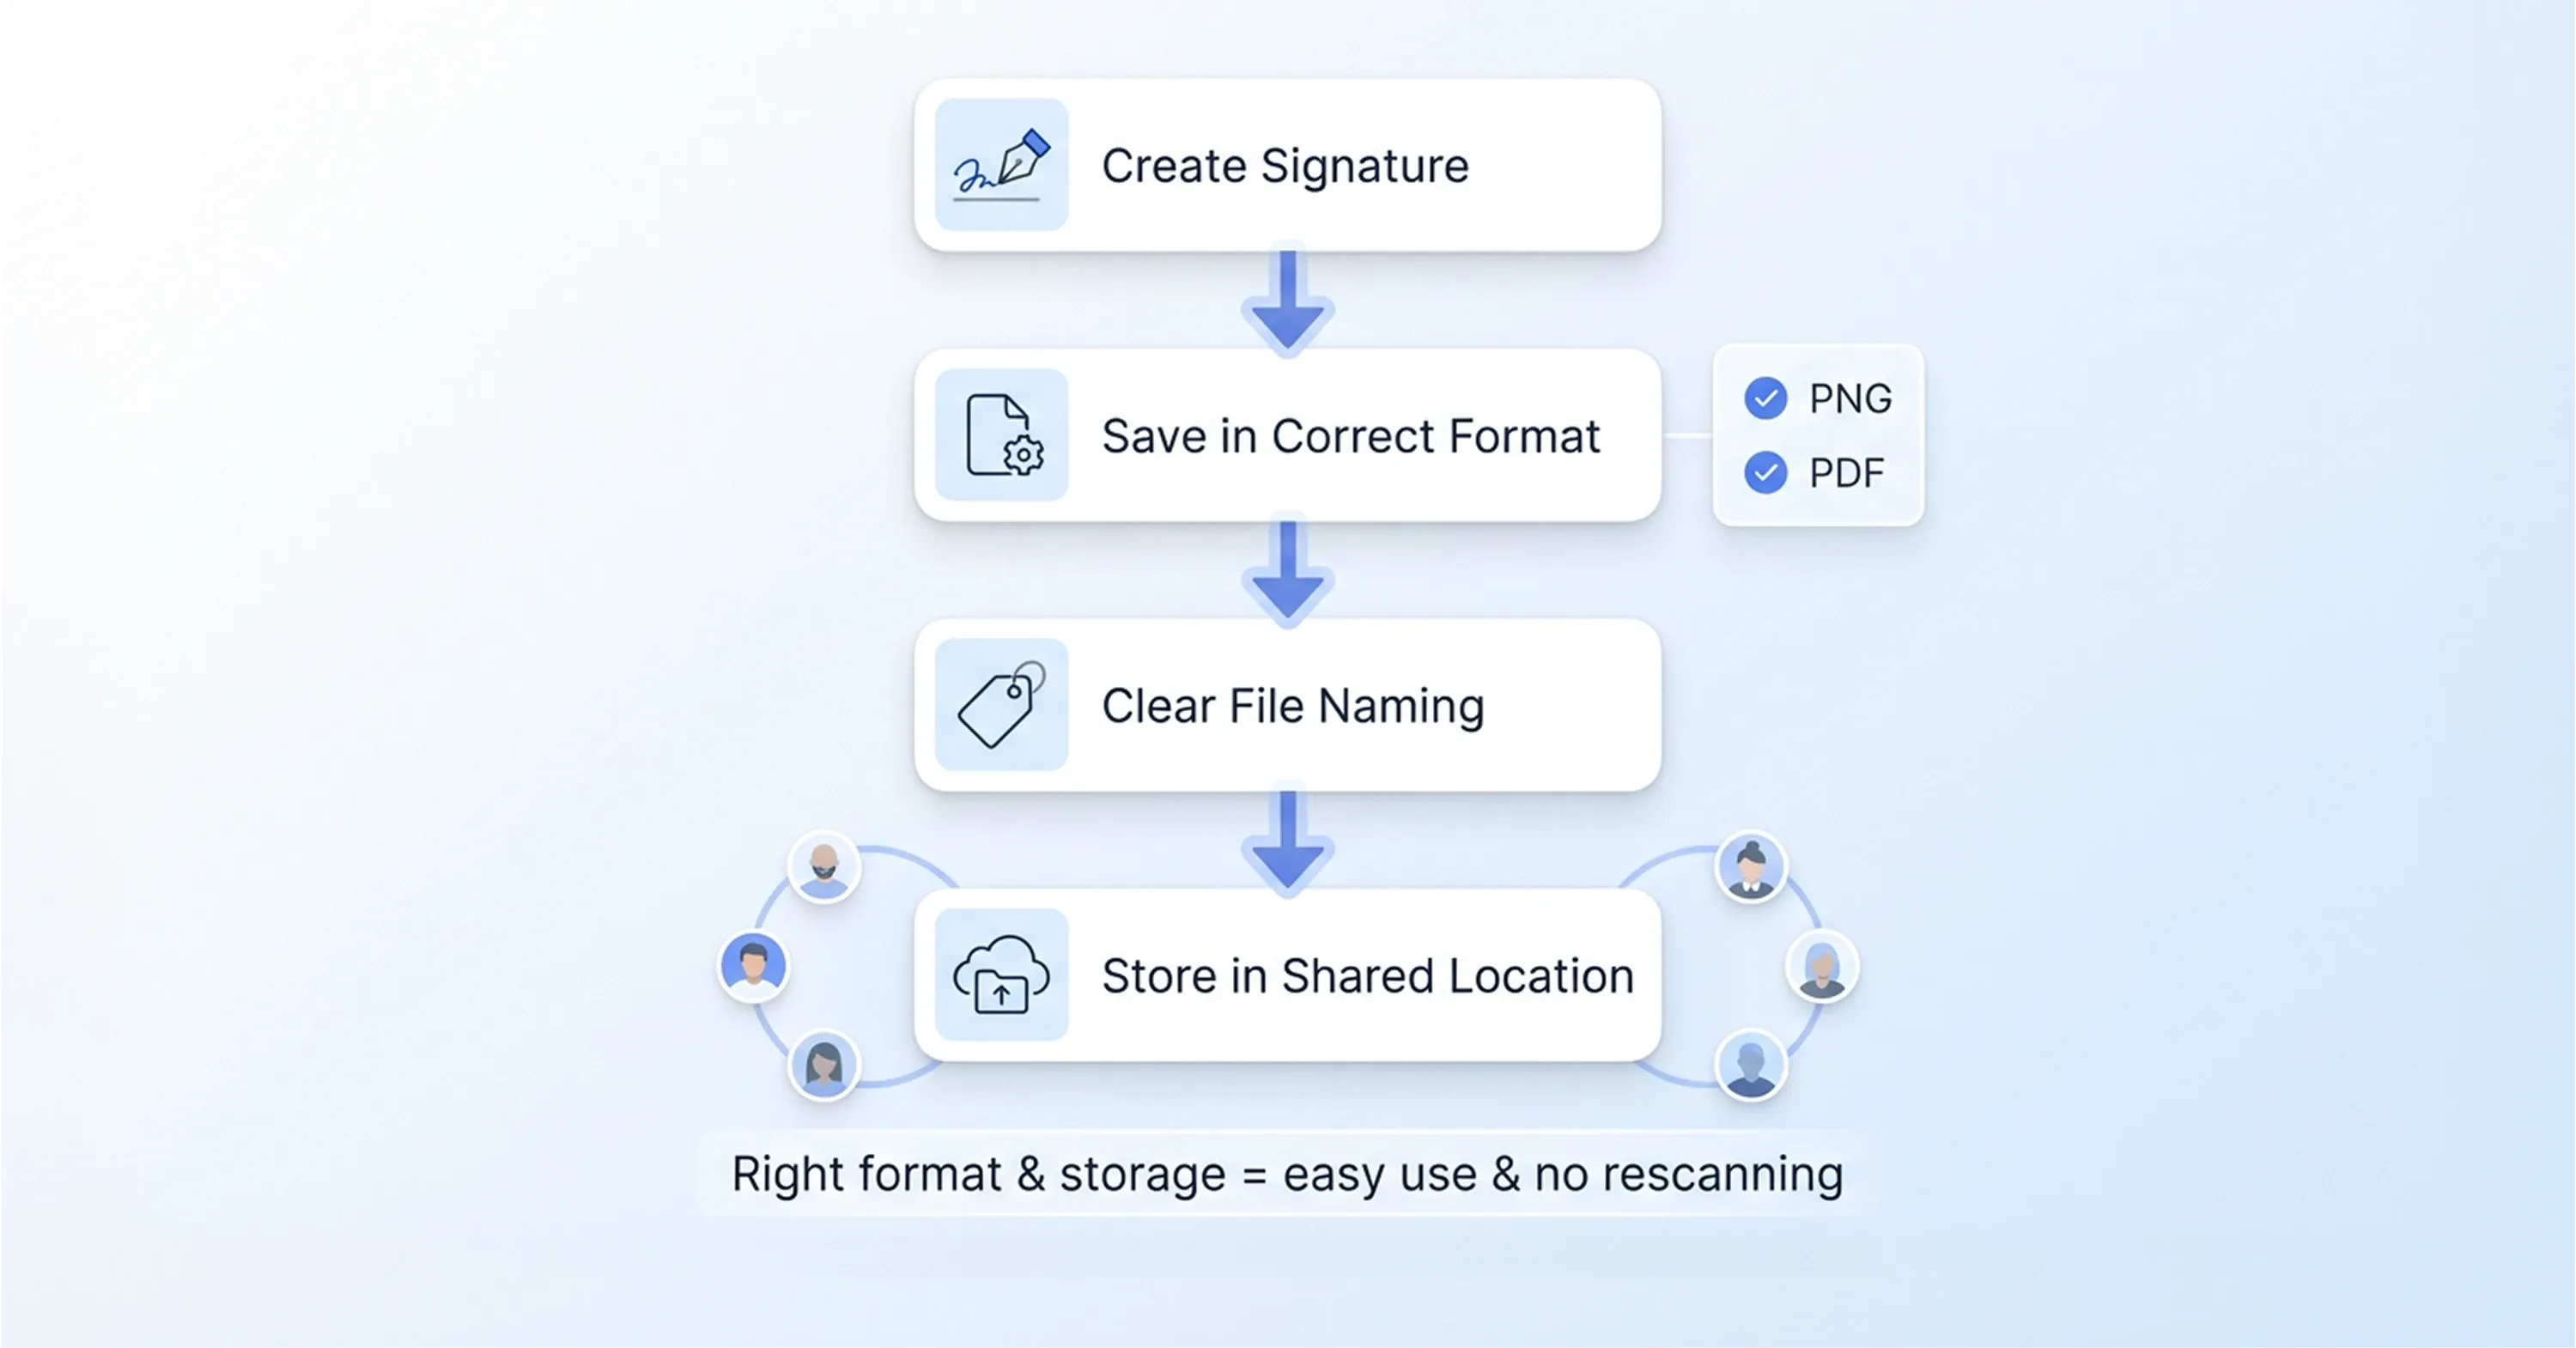
How to turn a handwritten signature into a digital one: Sign your name in dark ink on white paper. Scan or photograph it at 300+ DPI. Clean up the image by increasing contrast and removing the background. Save as a transparent PNG. Insert the image into Word, PDF, or e-signature tools. For most business use cases, this constitutes a legally valid simple electronic signature.
Сonclusion
Turning your handwritten signature into a digital one is a small change with a disproportionate impact. What starts as a simple scan-to e-signature process quickly removes one of the most persistent bottlenecks in everyday operations: printing, signing, scanning, and chasing documents. The real value isn’t just convenience. It’s consistency. Once your signature is digitized and reusable, document workflows become faster, more predictable, and easier to scale across teams. HR can onboard employees without delays, sales can close deals faster, and operations can keep approvals moving without friction.
At the same time, it’s important to recognize where a simple signature image fits. For everyday business documents, it works perfectly. But as document volume grows or compliance requirements increase, businesses often move toward structured e-signature workflows with audit trails, access control, and verification layers. That’s the shift happening across the market. Digital signatures are no longer just a shortcut - they’re becoming part of a broader document infrastructure.
So start simple: write it once, scan it properly, clean it up, and save it in the right format. From there, you can build toward a fully digital signing process that saves time, reduces errors, and keeps your business moving forward.